Showing posts with label Free Lightrrom Preset. Show all posts

Friday, December 24, 2010

Inside the Insanity of the Mind of a Modern Day Scrooge Sharing the Holiday Love

Being that I am in a very depressed state, I was actually going to post a post about how much I hate the holidays and why. I actually just wrote a 20 page rave about my loathing for the holidays, but rather than vent my holiday humdrums on the few readers that frequent this blog, I thought that I would simply share some love and give some stuff away and I deleted the 20 page rave.

So now to spread the joy of love of the season.


Presets....
 In many cases the light of the scene may actually reduce the saturation of the lips of your subject. As you can see from the photograph on the left, this is exactly what happened to my model.
This is where the CMS-Lipstick brushes come in handy. You can now add back a natural pink or red color to the lips of your subject.


The first of the two presents is CMS-Lipstick – Pink. This creates a natural looking tone to the surface that it is applied to.
In the photograph on the right, her lips just pop a little more than in the before photograph above. It is subtle, but it works amazingly.
In the application process, I zoomed in at a 3:1 ratio and then used a brush size of 8.9 with a feather setting of 52 to create a soft line around the edges. I also did not use the Auto Mask because that can create holes in the application due to the texture and color shifts that happen around the mouth.

The first of the two presents is CMS-Lipstick – Red. This creates a less natural looking tone to the surface that it is applied to.

In the photograph on the right, her lips jump right out as compared to the results of the Pink preset photograph above and to the right. It is subtle, but it works amazingly.
In the application process, I zoomed in at a 3:1 ratio and then used a brush size of 8.9 with a feather setting of 52 to create a soft line around the edges. I also did not use the Auto Mask because that can create holes in the application due to the texture and color shifts that happen around the mouth.


To install the preset, copy the file in the zip (xxx.lrtemplate) to your Local Adjustment Presets folder on your computer. If you don't know where to find this folder, open Lightroom. Click on Edit menu and select Preferences. Click on the Presets tab and click the Show Lightroom Presets Folder... button.

And now a little photo love...


MERRY CHRISTMAS EVERYONE

Friday, November 26, 2010

Lightroom Presets: 6 Black and White Presets

Today I am giving you five black and white presets, talk about a Black Friday Special... and you don't even have to deal crowds here. Four of the free presets I am giving away are color filtered presets and the fifth is a strong contrast black and white preset.


The image to the left is a strong black and white image on its own, but with a little boost of contrast or using a color filter the image can change either a little or drastically.

The image below is the same image with the Black and White Blue Filter. This is applied by amplifying the blue tones sliders in the B&W tab in the HSL tool.


Black & White Blue Preset
 Blue comes in many tones ranging from green-blue (aqua), blue and red-blue (purple). I accomplish this type of effect by increase the gray value of blue to 100%, and the gray values of aqua and purple to 50%. All other colors are set to zero. As a result, anything with a blue tone to it is brighter and more vibrant.

You may notice a light shift in the blue tones in the water. Click on any of the images to see a larger version of the image and see more detail in subtle changes.


Black & White Green Preset
 The Black and White Green Filter image is the same image but with a green filter applied to it. This is applied by amplifying the green tones sliders in the B&W tab of the HSL tool.


Green comes in many tones ranging from yellow to green-blue (aqua). I accomplish this type of effect by increase the gray value of green to 100%, and the gray values of aqua and yellow to 50%. All other colors are set to zero. As a result, anything with a green tone to it is brighter and more vibrant. Looking closely at the image, click on it to see the larger version, the belt of the young man is brighter than the original image above.


Black & White Red Preset
 The Black and White Red Filter image is the same image but with a red filter applied to it. This is applied by amplifying the red tones sliders in the B&W tab of the HSL tool.


Red comes in many tones ranging from Magenta to orange. I accomplish this type of effect by increase the gray value of red to 100%, and the gray values of magenta and orange to 50%. All other colors are set to zero. As a result, anything with a red tone to it (mainly in the skin in this image) is brighter and more vibrant. Looking closely at the image, click on it to see the larger version, the ribs of the young man and the arm of the young lady are brighter than the original image above.

Black and White Yellow Preset
The Black and White Yellow Filter image is the same image but with a yellow filter applied to it. This is applied by amplifying the yellow tones sliders in the B&W tab of the HSL tool.


Yellow comes in many tones ranging from orange (red-yellow) to green (green-yellow). I accomplish this type of effect by increase the gray value of yellow to 100%, and the gray values of orange and green to 50%. All other colors are set to zero. As a result, anything with a yellow tone to it (mainly in the skin highlights) is brighter and more vibrant. Looking closely at the image, click on it to see the larger version, the ribs of the young man and the arm of the young lady are brighter than the original image above and are highlighted differently than the Black & White Red preset results.


Black & White Original Image
 Finally, we have the strong contrast black and white preset.

Contrast in photography is the opposition of light and shadow. The more opposition there is between light and shadow the stronger the contrast.


In the original photo on the left, there is a natural high contrast to the image due to the position of the unfiltered sun in the sky. This contrast can be exploited to make a strong artistic statement with a few adjustments I made and saved as a preset.


Black & White Strong Contrast
 By amping the contrast, black levels and tweaking the tone curve into a strong S-Curve, the contrast of the image is made unnaturally strong creating a depth to the image that was lacking in the original. The patterns in the water are more pronounced and the highlights on the back of the boy are blown out completely.


Now while blown highlights are not a good thing according the rules; it is only a rule so it can be broken if it helps the image to work. In this case, I like the result and am sticking by it.

Download B&W Blue Here

Download B&W Green Here

Download B&W Red Here

Download B&W Yellow Here

Download B&W Strong Contrast Here

To install the preset, copy the file in the zip (xxx.lrtemplate) to your Develop Presets folder on your computer. If you don't know where to find this folder, open Lightroom. Click on Edit menu and select Preferences. Click on the Presets tab and click the Show Lightroom Presets Folder... button.

Saturday, October 30, 2010

Free Lightroom Preset: Waves Preset


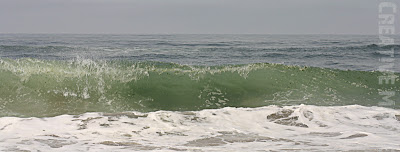
Waves Before

This image is fairly flat and lacks that needed punch to make it something worth looking at. So while on vacation, at the coast of all places, I worked on a preset that generated the look that I was going for to make those waves pop. Take a look at the larger version (click on the image on the left) to see what I mean by this photo not having any pop.

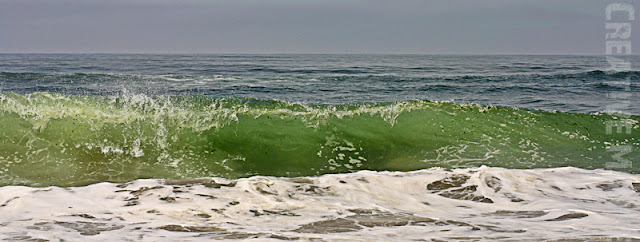
Waves After Preset
The image above is the result after the preset is applied. I accomplished this look by making changes to the following setting in Lightroom; grain frequency 50, grain size 25, Recovery 66, Green Luminance 100, Noise Reduction Detail 50, Luminance Smoothing 18, Tone Curve settings (darks -12, Highlights Split 75, Lights 22, Shadows Split 25) and Vibrance 33. Because of the grain settings of this preset, it is specifically for Lightroom 3. 

Download Here

To install the preset, copy the file in the zip (xxx.lrtemplate) to your Develop Presets folder on your computer. If you don't know where to find this folder, open Lightroom. Click on Edit menu and select Preferences. Click on the Presets tab and click the Show Lightroom Presets Folder... button.

Tuesday, October 26, 2010

Lightroom Presets: 7 Selective Coloring Presets

Roy G Biv in the House!
Selective color is a fun process of making colors pop on an otherwise black and white image. I chose the image on the right to be my sample image because just about every color in the rainbow is on display here. Say hello to my oldest daughter a.k.a Monkey Jr.


Let me explain the purpose of selective color, as I understand it. Selective color is generally used to highlight something of significance in scene; think of the little girl in Schindler’s List with the red coat in a film that was shot in all black and white. The girl and her red coat was how it was seen through Schindler’s eyes. And when he saw the coat in the pile of burning bodies it was at this point that he realized he could no longer turn a blind eye to the evils being committed by the Nazi party and began his quest to save as many prisoners as he could. Selective color in that film was used very carefully to convey a powerful statement that made the viewing experience of the movie more personal for the viewer and created a personal attachment to the little girl that made her death more emotional.

Today, selective color is, for the most part, used all too freely. It does not make an impact to the photo. It is just used for the cool factor. But in the sea of selective color photos there are a few images that do selective color properly, but they are lost in that sea.


In presenting these seven presets, I suggest using this treatment where it will make an impact. Use it to add something other than the cool factor to your image. So without further lecturing I present the seven presets.

Selective Color: Aqua

Selective Color: Aqua


Aqua is made up of two primary colors; green and blue. So to get the aqua to pop I adjusted the hue of the green to the aqua hue, +100, and the adjusted the hue of the blue to aqua, -100. There is no bump in saturation for any of the three hues, but all hues outside of aqua are taken to a saturation of -100.

While this photo, on the right, will not win any awards for brilliance, it does show the effectiveness of this preset quite well.


Selective Color: Blue


Blue includes two colors outside of blue; purple and aqua. So to get the blue to pop I adjusted the hue of purple to the blue hue, -100, and adjusted the aqua hue to the blue hue. +100. There is no bump in saturation for any of the three hues, but all hues outside of blue are taken to saturation of -100.

In the case of the blue, some other tweak might need to be applied for this image. Notice the blue in her shirt and possibly her eyes? This would require a local adjustment brush, set to -100 saturation, to remove. A little more effort, yes, but the results would be stunning.

Selective Color: Green


Green includes two colors outside of the green hue; yellow and aqua. So to get the green to pop I adjusted the hue of aqua to the green hue, -100, and adjusted the yellow hue to the green hue. +100. There is no bump in saturation for any of the three hues, but all hues outside of green are taken to saturation of -100.

Some other tweak might need to be applied for an image. If the image had the girl wearing a green shirt or pants, this would require a local adjustment brush, set to -100 saturation, to remove. A little more effort, yes, but the results would be worth the effort.


Selective Color: Orange
 Selective Color: Orange


Orange includes two colors outside of the orange hue; yellow and red. So to get the orange to pop I adjusted the hue of yellow to the orange hue, -100, and adjusted the yellow hue to the red hue. +100. There is no bump in saturation for any of the three hues, but all hues outside of orange are taken to saturation of -100.

Some other tweaks need to be applied for this image. As you can see from this image, the girl’s face, hands and lips have an orange/reddish hue to them, basically any flesh tone. This would require a local adjustment brush, set to -100 saturation, to remove. It is a little more effort, yes, but the results would be worth it.

Selective Color: Purple


Purple includes two colors outside of the purple hue; blue and magenta. So to get the purple to pop I adjusted the hue of magenta to the purple hue, -100, and adjusted the blue hue to the purple hue. +100. There is no bump in saturation for any of the three hues, but all hues outside of purple are taken to saturation of -100.

Some other tweaks need to be applied for this image. As you can see from this image, the girl’s shirt has a purple hue to it. This would require a local adjustment brush, set to -100 saturation, to remove. It is a little more effort, yes, but the results would be worth it.

Selective Color: Red


Red includes two colors outside of the red hue; orange and magenta. So to get the red to pop I adjusted the hue of orange to the red hue, -100, and adjusted the magenta hue to the red hue. +100. There is no bump in saturation for any of the three hues, but all hues outside of red are taken to saturation of -100.

Some other tweaks need to be applied for this image. As you can see from this image, the girl’s face, hands and lips has a purple hue to it. This would require a local adjustment brush, set to -100 saturation, to remove. It is a little more effort, yes, but the results would be worth it.

Selective Color: Yellow

Yellow includes two colors outside of the yellow hue; orange and green. So to get the yellow to pop I adjusted the hue of green to the yellow hue, -100, and adjusted the orange hue to the yellow hue. +100. There is no bump in saturation for any of the three hues, but all hues outside of red are taken to saturation of -100.

Some other tweaks need to be applied for this image. As you can see from this image, the girl’s face, hands and hair has a purple hue to it. This would require a local adjustment brush, set to -100 saturation, to remove. It is a little more effort, yes, but the results would be worth it.

Download Aqua Here


Download Blue Here

Download Green Here

Download Orange Here

Download Purple Here

Download Red Here

Download Yellow Here

To install the preset, copy the file in the zip (xxx.lrtemplate) to your Develop Presets folder on your computer. If you don't know where to find this folder, open Lightroom. Click on Edit menu and select Preferences. Click on the Presets tab and click the Show Lightroom Presets Folder... button.

Monday, October 18, 2010

Lightroom Preset: CMS - BW Face

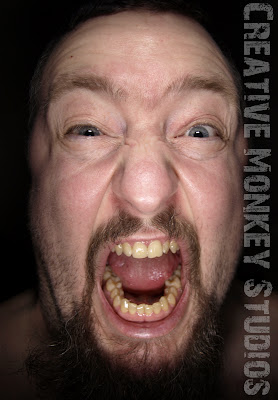
Before the B&W Face Preset
Yes this is a scary image of me. But that was the intent. Once day I did a series of shots based on movie characters. I posed for shots of the likes of Gandalf from the Lord of the Rings trilogy and Hannibal of Silence of the Lambs and this one, my favorite from the series, is my King Leonidas from the movie 300. Imagine the words "This is Sparta" being bellowed out.


See this image as a reference to what I was trying to accomplish:

So while the color image has its own power and impact, I was actually envisioning something a little more powerful... something a little more shocking. Something that would make people say OGM! 

So I began playing with a black and white version of the image in Lightroom and wouldn't you know it, I was able to create the image I envisioned.


In the image on the right, yes it is the same image, I developed a setting that I was able to use on all of the series images. I made the following adjustments once I converted the image to black and white:

Blacks is set to 25, Clarity set to 100, Contrast set to 91, Aqua gray value set to -12, Blue gray value set to 29, Green gray value set to -24, Magenta gray value set to 10, Orange gray value set to -11, Purple gray value set to 15, Red gray value set to -10, Yellow gray value set to -16, Recovery set to 33 and in the tone curve my settings were Highlights 0, Lights 23, darks -20 Shadows 0; which creates a slight S-Curve. A fun way to add some serious intensity to an already tense image.

Download Here

To install the preset, copy the file in the zip (xxx.lrtemplate) to your Develop Presets folder on your computer. If you don't know where to find this folder, open Lightroom. Click on Edit menu and select Preferences. Click on the Presets tab and click the Show Lightroom Presets Folder... button.